Grabbing attention with text is an integral part of our culture and marketing strategy. With graphics software, designers can easily create bold or subtle text designs that stand out from the rest. In fact, some profitable commercial product designs are completely text-based.

5 ways to make text designs standout with Affinity Designer
- Text on curves
- Text in shapes
- Outline Text
- Typography
- Styles filter
Why design or make text standout in Affinity Designer?
Knowing how to design or make text standout can be a useful or valuable skill to acquire. Whether you are a graphic designer, teacher, marketing professional, speaker, entrepreneur, or blogger, the ability to design a good visual text display can be a significant benefit to our presentation skills.
Affinity Designer is a powerful and reasonably priced one-time payment vector graphics editor software. They may offer discounts from time to time and during holidays.
Text on curves
How to create text on curves in Affinity Designer
- Draw or create a curve
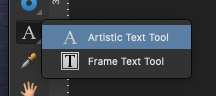
- Select the Text Tool (Artistic Text) on the left
- Make sure the curve layer is selected and hover the mouse over the line until the mouse icon changes to a T on a curve
- Click and start typing some text
- Adjust the text start location and upside down text effect with the green and red handle


Text in shapes
How to put text in Shapes in Affinity Designer
- Select shape from Shape Tool
- Remove color from the shape by clicking the slash in a white circle icon in Fill above (optional)
- Select the Text Tool with the Frame Text Tool option
- With the shape layer on the right still selected, hover the mouse over the shape until it became a T in a pentagon
- Click and start typing to fill the shape with text.


Outline text
How to outline text in Affinity Designer
- Create text with the Artistic Text Tool. Use a preferred font.
- Select that text layer and Ctrl-J to duplicate it
- Change the colour for the bottom layer
- Click the Contour Tool on the left
- Click the big white dot above the text and drag left or right to adjust the effect


Let us take this a step further to make this design standout more by modifying the first letter.
How to change the outline for a letter in Affinity Designer?
- With the duplicated bottom layer selected, click Bake Appearance above to convert from a text layer to a group of curves layer
- Select the last element in the group (which is the first outlined letter in the text)
- Select Contour Tool and adjust the outline effect as before by clicking the big white dot above left or right


Another faster way to create outlined text is with the use of the Outline effect in Effects just next to the layer tab.

Typography
How to make text standout with typography in Affinity Designer?
- Create text with the Artisic Text Tool
- Select all the text and click the ‘a’ (Character options) icon above
- Explore the typography options for your preferred result


Alternatively, you may also want to check out Glyph Browser to make your text letters stand out.
Styles filter
How to apply styles to text in Affinity Designer?
- Create text with Artistic Text Tool
- With the layer selected, click the Styles tab
- Click a style to apply the text


Tip: CMD+z to undo changes to apply other styles.
Why is adding text to photos important?
One of the easier ways to make enough significant modifications to stock photos e.g. Pexels for commercial merchandise use is with the addition of artistic typography.
Please be sure to read the terms and conditions for the particular free stock photos platform as they may vary.
Conclusion
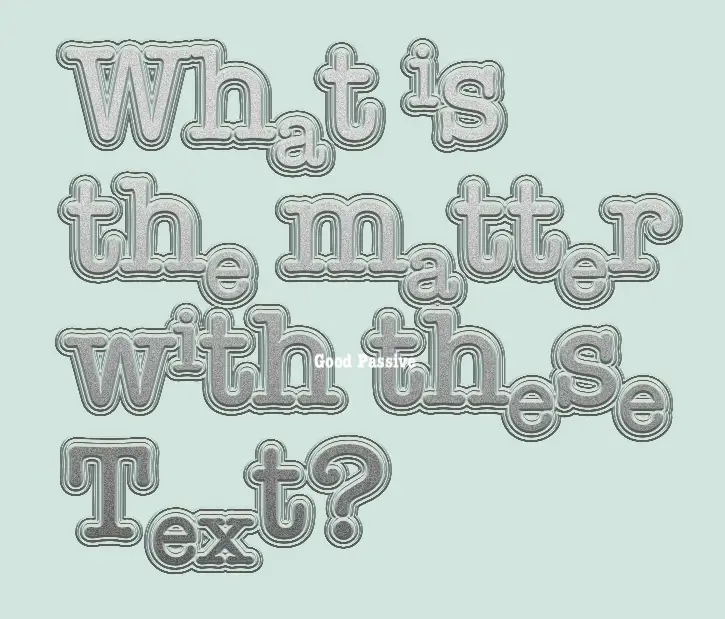
We can mix and match different text techniques to create new artwork for sharing or selling. Below is an example of an artwork that combines typography and style in Affinity Designer.

Be creative and have fun coming up with good artistic text designs 😃

Be wholesome.
More Information
Are there more resources for making text stand out?
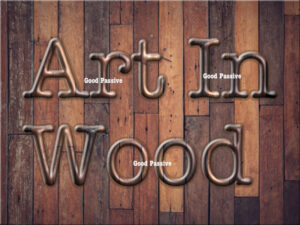
Good Easy Text Wood Engraving Effect In Affinity Designer
5 Ways To Make Text Standout With Affinity Designer
Is there a good Blender 3D courses (including 3D text) for beginners?

How to make a 3D text effect with Affinity Designer?

How To Create Good 3D Extruded Text (Affinity Designer)
Where to find more text effects ideas for Affinity Designer?
There are more tutorials on YouTube.
How to draw curves in Affinity Designer?
3 Ways To Create Curves In Affinity Designer (Beginners)
Where to learn Affinity Designer for beginners?
You may check out free YouTube videos: Learn How To Use Affinity Designer Part 1, Part 2, and Part 3 for beginners from an experienced T-shirt seller.