This is for the convenience of the quick download of PNG for common graphic design usage in 3 categories: Web, Photo, and Paper sizes.
Note:
- Only some common sizes are included.
- Please remember to save as PNG after editing or the transparent feature will not work.
- Embedding PNG images here will only blend into the page background and not possible to view the image size so only the links to the files are provided. An example is the featured image below.
- To download, right-click on the link and click Save Link As.
Web
FHD 1080p 1920×1080 16:9 PNG Transparent – This may be the most common for modern Full HD graphics size.
Social Media Square Post 1080×1080 PNG 1:1 Transparent – A possible size for the featured image of square displays for example.
Social Media Portrait Post 1080×1350 PNG Transparent – Social media platforms that favor portrait size e.g. Pinterest.
CD Cover Digital Release 3000×3000 PNG Transparent – CD Covers.
SVGA 800×600 4:3 PNG Transparent – Some image sizes may seem too big for display so this may work.
Photo
Photo 4R 4×6 inch 3:2 PNG Transparent – This is one for the common photo size.
Photo 5R 5×7 inch 7:5 PNG Transparent
Photo 8R 8×10 inch 4:5 PNG Transparent
WordPress Logo And Favicon
WordPress Favicon PNG 512×512 px Transparent
WordPress Logo PNG 250X150 px Transparent
Bonus
Paper
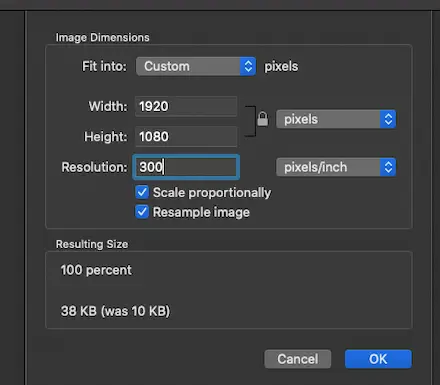
Please note these are in 72 dpi. However, that can easily be changed with Mac Preview->Adjust Size to another dpi e.g. 300.

Redbubble
Redbubble Stickers 2800 x 2800 px CMYK 200 DPI Transparent PNG
Redbubble General 7632 x 6480 px CMYK 300 DPI PNG Transparent
More Information
What if I need another custom size for my PNG image?
Mac Desktop Default image Preview app can easily resize with Tools-> Adjust Size. Please unlock the lock icon to change size without proportion. Another good reason to use Preview to adjust image size is that it will reduce or compress image size automatically. Preview also auto-save so there is no need to export or save. This is useful when processing many images manually. To undo a change, press CMD+z.

How to easily and quickly annotate or blur an image?
Skitch Evernote App (Mac, iPad, iPhone) is a tool I used for years to quickly annotate with text that stands out in colors, add simple arrows or borders, and blur out certain portions.

How to capture the screenshot on a Mac desktop?
The most useful I found is CMD+Shift+4 to capture the selected portion of the screen with click and drag. It should save to the Desktop by default. The default folder can be changed by pressing CMD+Shift+5 and selecting options->Other locations.


